OK, what if my PC is unsupported?
Here’s where things start to get fun (and by “fun," I mean “frustrating and moderately risky”).
Officially, any PC that doesn’t meet all of Windows 11’s requirements gets treated the same. Unsupported means unsupported, and Microsoft doesn’t want you running Windows 11 on your PC. At all.
Unofficially, the Windows 11 installer distinguishes between two broad groups of unsupported PCs: there are PCs that support Secure Boot and have any kind of TPM at all, even an older TPM 1.2 module. And there are PCs that are missing one or both of those features.
The short version is that if you bought your PC with Windows 8 or Windows 10 on it, an unsupported installation isn’t too difficult. If your PC was made to run Windows 7 or something even older (and if it still meets the 64-bit processor and RAM requirements), then it’s more difficult, and you really should just continue running Windows 10 on those computers.
Installing on a PC with Secure Boot and any kind of TPM
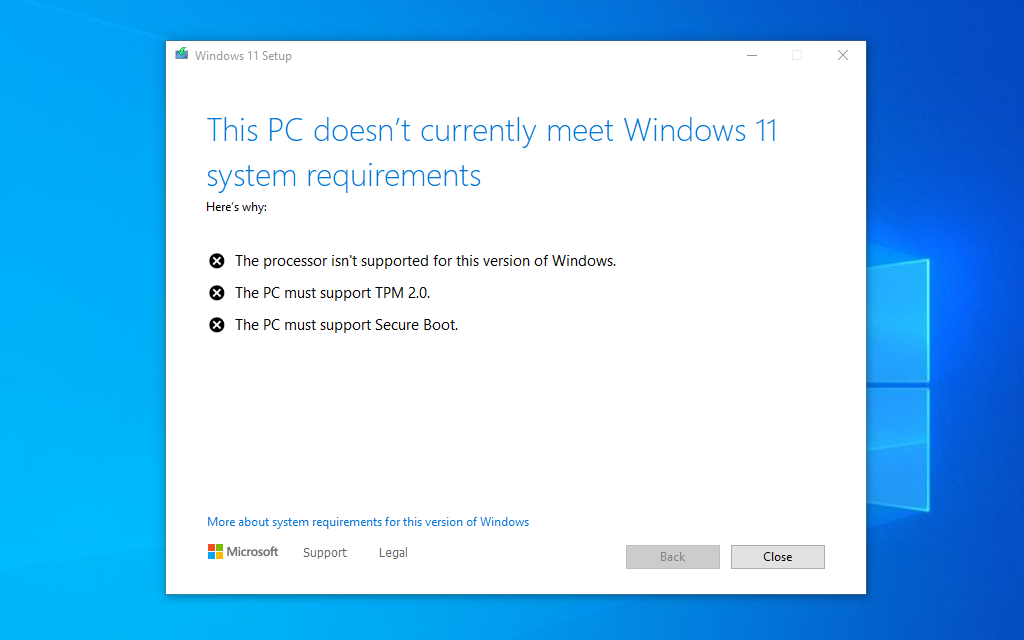
If you’re running the Windows 11 installer from within Windows to perform an upgrade install, the installer will refuse to run if your PC fails to meet the CPU or TPM requirements. This barrier to entry will keep casual users from downloading and installing Windows 11 on unsupported computers easily.
But Microsoft has published a bypass for those who really want to install Windows 11 on hardware that at least supports Secure Boot and some kind of TPM. It requires a trip to the Registry Editor, so tread lightly and ensure your important data is backed up.
- Press Windows + R and type
regeditand press Enter to open the Registry Editor. - Navigate to
HKEY_LOCAL_MACHINE\SYSTEM\Setup\MoSetup. Note that in my testing, theMoSetupfolder didn't exist until I had already run the Windows 11 installer and allowed it to fail. You can create it yourself if it isn't there. - Right-click the
MoSetupfolder and create a new DWORD value namedAllowUpgradesWithUnsupportedTPMOrCPU(this is case-sensitive, so pay close attention to the capital letters). - Double-click the entry you just created and change the value from 0 to 1.
Windows 11 will now install normally, though you will see this update warning before you’re allowed to progress:
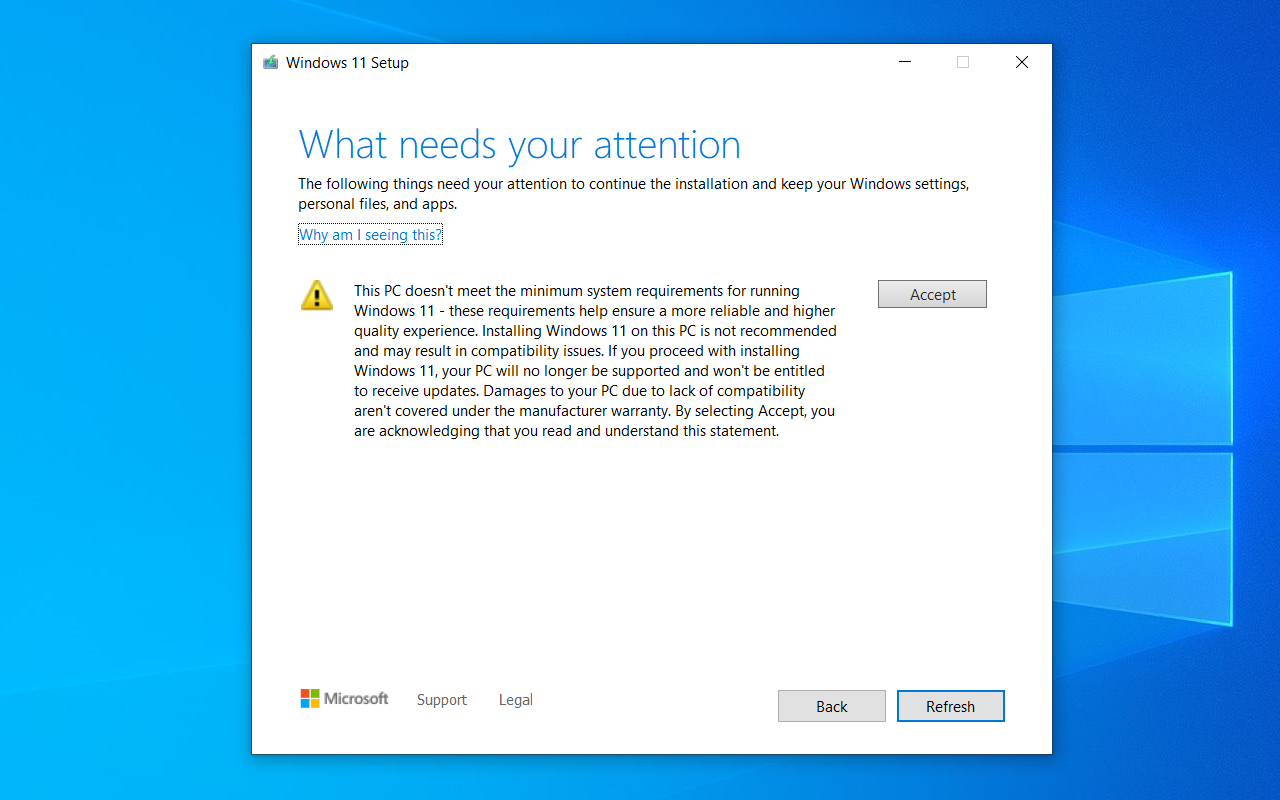
If you just want to do a clean install from a bootable USB drive, the Windows 11 USB installer will run normally on any PC as long as Secure Boot is enabled and some flavor of TPM is present, no registry edits required. This is convenient if you’re just installing Windows 11 for testing purposes or if you typically do a clean install any time you install a major OS update.
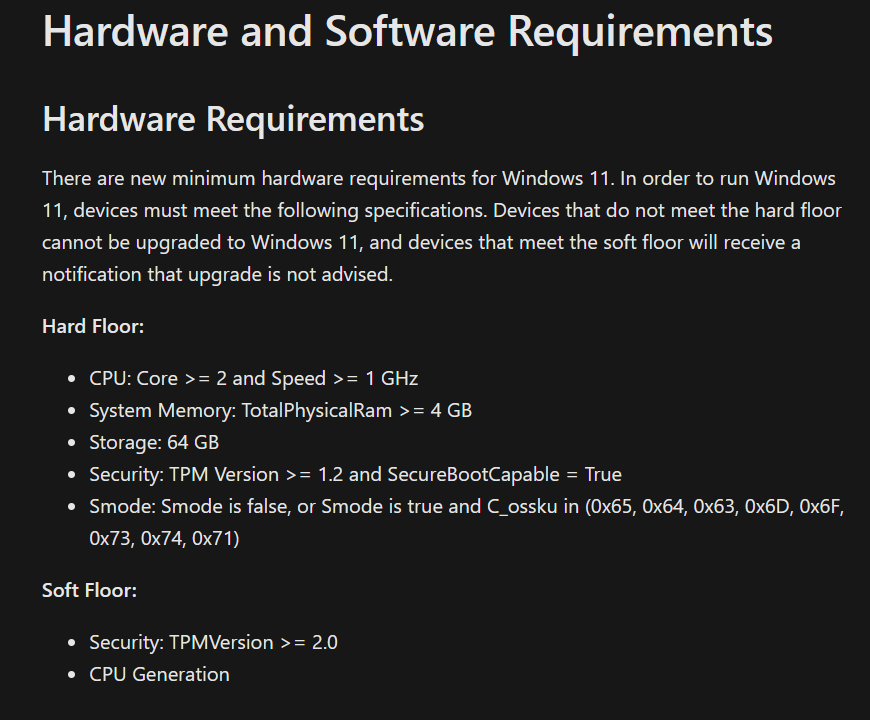
If you were paying close attention right after Windows 11 was announced, you might remember that Microsoft briefly published a document with both “hard floor” and “soft floor” requirements for Windows, pictured above. Microsoft quickly removed this language, but it’s worth noting that the “hard floor” specs do seem to be what the bootable USB version of the Windows 11 installer is actually looking for.
The easy way to skirt the Secure Boot, TPM, and Microsoft account requirements: Use Rufus
Systems without a TPM or Secure Boot support are trickier, but not impossible. We'll outline all of the steps you need to use to manually skirt Windows 11's install requirements, for those of you who prefer to know exactly what settings you're changing and why.
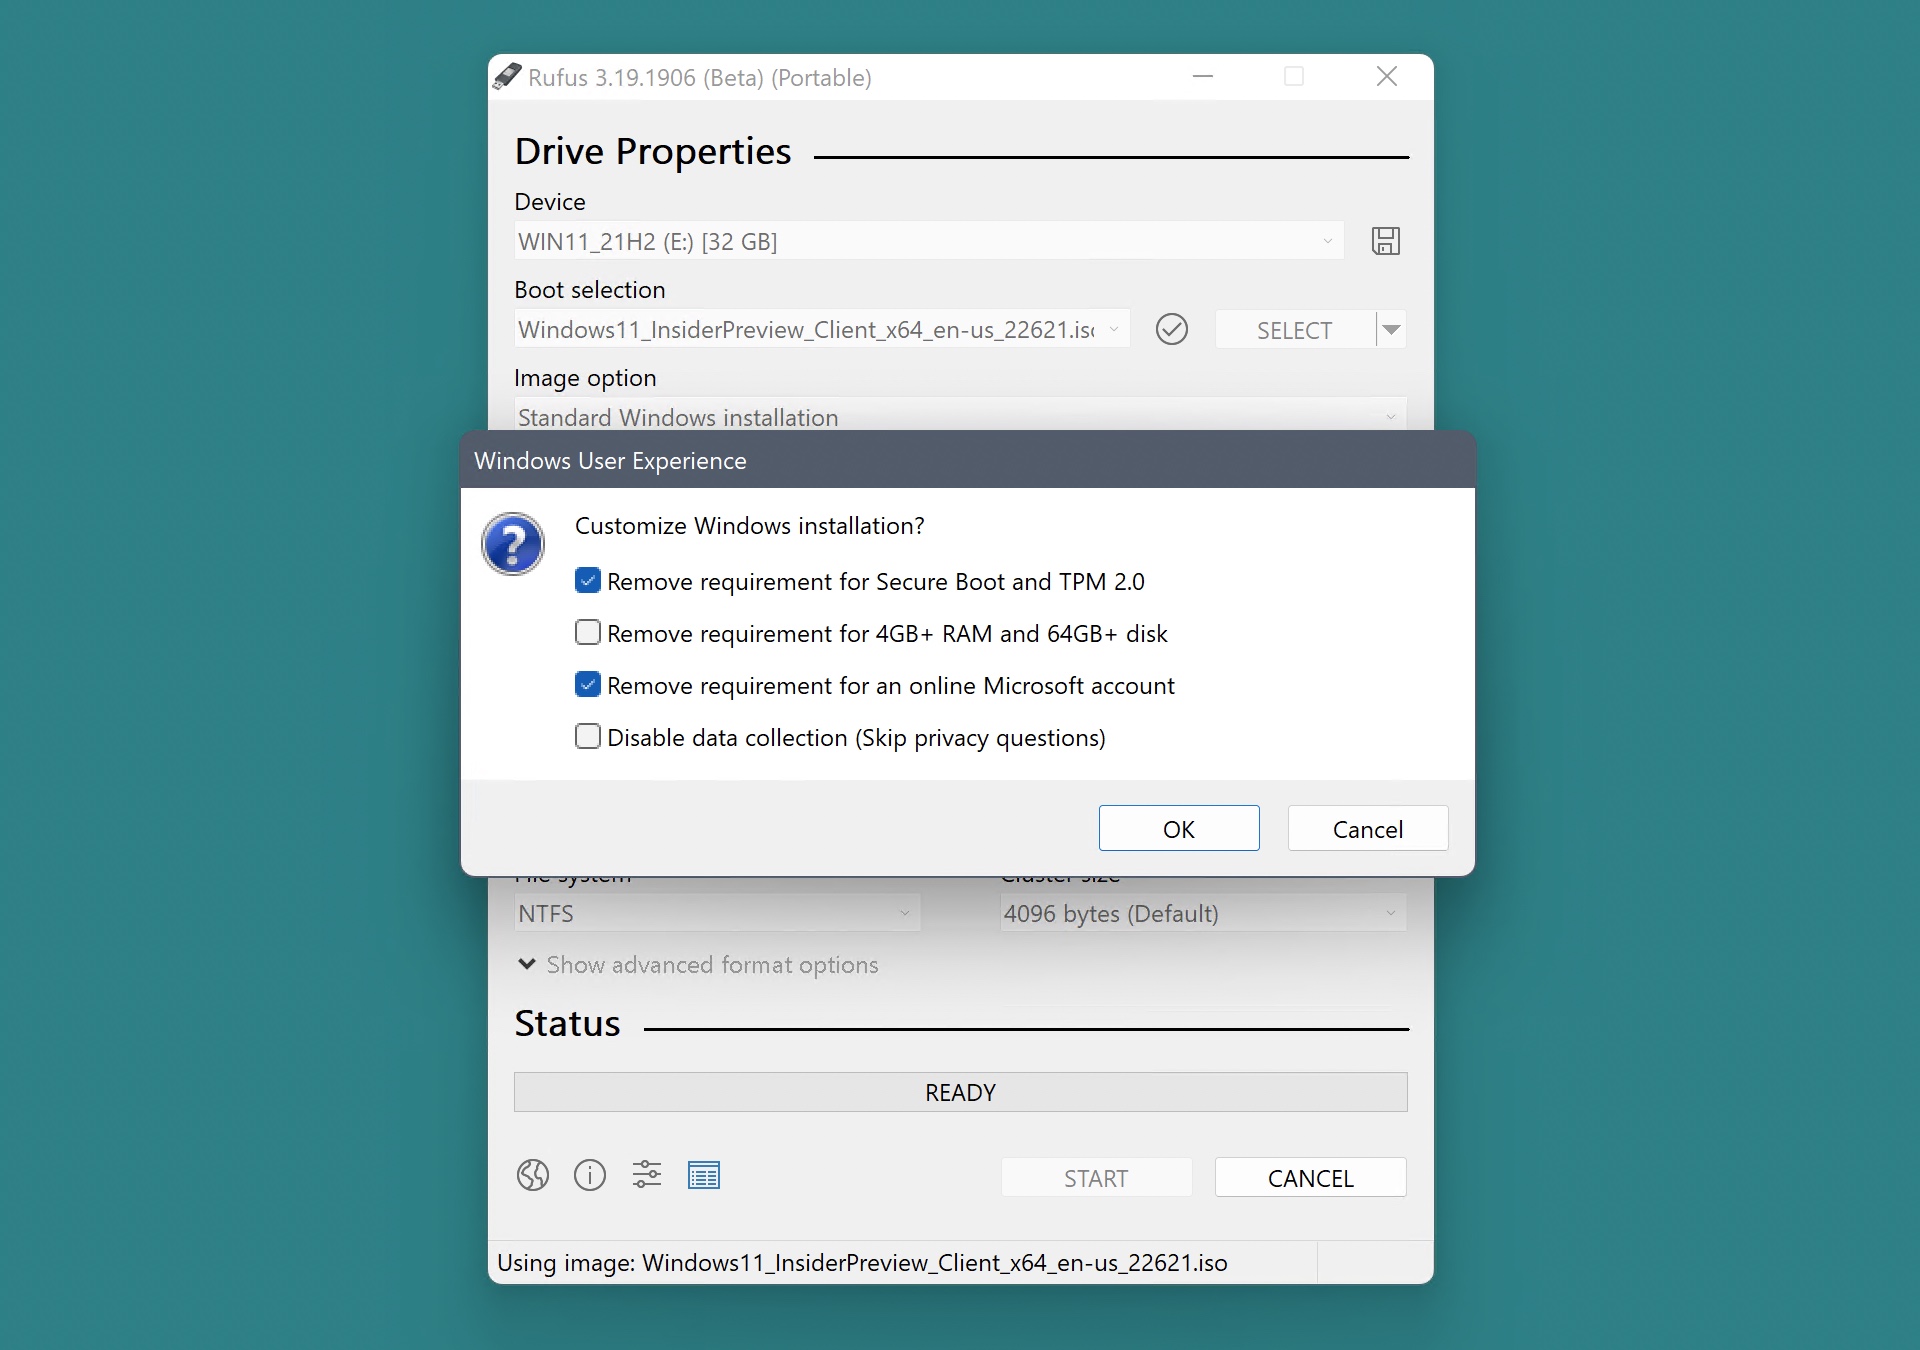
But since the launch of Windows 11, an open source tool called Rufus has added features that automate some of the install tricks we outline below, and it can remove the Microsoft Account requirement for Windows 11 Home and Windows 11 22H2.
To use Rufus, you'll want an 8GB-or-larger USB drive, plus a Windows 11 ISO downloaded from Microsoft. Select both the USB drive and the ISO file from within Rufus and hit Start, leaving all other settings at their default values; a confirmation pop-up will appear asking you whether you want to customize your installation. It's here that you can choose to remove the various install checks, including not just the Secure Boot and TPM requirements, but the RAM and storage requirements too (though this isn't something we recommend).
If you want to remove the Microsoft account sign-in requirement, note that the Rufus tool doesn't totally remove it, but reverts the installer to the Windows 10-era status quo. If you connect to the Internet during setup, you'll still be asked to sign in before you can do anything else. If you leave your PC disconnected, you'll see a "limited setup" fallback option that will let you go ahead with a local Windows account.
Importantly, removing these requirement checks (using Rufus or any other method) doesn't prevent Secure Boot or TPM features from working once you've installed Windows 11. The same Rufus-created USB stick can be used to install Windows 11 on both supported and unsupported systems with no loss of security or functionality.
Manually installing on a PC without Secure Boot or a TPM
-
Old Windows 7-era hardware like this HP Pavilion dv5 won't run Windows 11 especially well, but you can still give it a try.Andrew Cunningham
-
This old Core 2 Duo Inspiron 530 tower, which dates back to roughly 2008, is the oldest thing I've had Windows 11 running on.Andrew Cunningham
If you don't want to use Rufus, there are some relatively simple registry edits you can do to a vanilla Windows USB installer to get it working on a system that's missing a TPM, Secure Boot support, or both. (As far as I can tell, there's no way to do an upgrade install from within Windows 10 on one of these old computers, so a clean install is your best bet.)
- Once you've booted to the Windows 11 Setup screen, press Shift + F10 to open a Command Prompt window, type
regeditand press Enter to open the Registry Editor - Navigate to
HKEY_LOCAL_MACHINE\SYSTEM\Setup. Right-click theSetupfolder and create a new key calledLabConfig(as with all registry edits, this is case-sensitive). - Right-click the
LabConfigfolder and create one new DWORD value namedBypassTPMCheckand another namedBypassSecureBootCheck. If your PC has Secure Boot but no TPM (or vice-versa), you can omit the key you don't need. - Double-click each entry you just created and change the values from 0 to 1. Proceed with the install as you normally would.
Using this method, I’ve been able to install and run Windows 11 on pretty much any 64-bit computer that could run Windows 10, including old pre-UEFI PCs like an HP Pavilion laptop with a first-generation Core i3 CPU and a Dell Inspiron PC with a Core 2 Duo processor and a Windows XP sticker on the front. I’m not recommending that you install Windows 11 on these kinds of machines! But there’s nothing in the OS that keeps it from booting and running.
This method should also work on newer computers where Secure Boot was disabled for some reason. But in those cases, I think the easier path forward is to enable Secure Boot, install Windows 11, and then disable it again.
Installing on a PC without a 64-bit CPU
There is literally no way to do this. Don't be silly.
What are the risks of running Windows 11 on an unsupported PC?
The most prominent risk you take with an unsupported Windows 11 PC is the one Microsoft makes you acknowledge before you install the OS: the company reserves the right to withhold updates, including security updates, from these machines.
Do I think Microsoft is likely to actually do that? For now, no. But Microsoft may not always leave these backdoors open for unsupported PCs in future iterations of Windows 11.
The other risk you run, especially on computers made before 2015 or 2016, is introducing instability and having incompatible drivers. First-generation AMD Ryzen chips and 6th- and 7th-generation Intel Core processors aren’t on Microsoft’s support list, but they at least support the kinds of modern “DCH” drivers that Microsoft points to when it talks about the stability of Windows 11 systems.
But the farther back you go, the more you risk running into old graphics, trackpad, or networking drivers that can cause big problems if they’re not working properly. And PC makers and chipmakers are not going back to their 2013-era chips to release new drivers or check that their old ones are working because, as a rule, there is no incentive for doing that.
Should I go through with an unsupported install anyway?
That’s up to you. If you’re not ready to drop everything and do a clean reinstall of Windows if something breaks, definitely not.
But if you're running a first-gen Ryzen processor or a 6th- or 7th-generation Core processor and have 8GB or more of RAM, a reasonably modern integrated or dedicated GPU, and some kind of SSD, your Windows 11 experience should be pretty good. On the 6th-generation Dell Latitude laptop and Asus prebuilt gaming desktop I’ve tested the operating system on, I’ve generally found that driver support hasn’t been a problem and that Windows 11 runs about as well as Windows 10 did.
But on older computers, particularly those that shipped with Windows 7, Windows 8, or Windows 8.1, you’re probably better off continuing to run Windows 10. As Microsoft has reiterated, Windows 10 will continue getting security updates until October of 2025. And Windows 10’s ubiquity (and underlying similarity to Windows 11) means both OSes will run the same software for the foreseeable future. If your older PC is running Windows 10 now, and it’s running it well, quit while you’re ahead.
One thing you probably don’t want to do on an unsupported system is enable the memory integrity security feature. Older processors take a larger performance hit from enabling this feature than newer ones do, as Gordon Ung has demonstrated in his thorough testing at PCWorld. Microsoft has been enabling it by default more widely in the upcoming 22H2 version of Windows 11, so if you notice abnormally slow performance on an older PC that was running Windows 10 just fine, check to see whether that feature is enabled.
reader comments
319